Jaybanuan's Blog

どうせまた調べるハメになることをメモしていくブログ

Pandasでgroupby()した際にパターンを網羅できない不完全な表になる場合の対処

はじめに

書きたいことをタイトルで端的に表現できずに困った。 例として、バナナとミカンとイチゴの販売データを表現するDataFrameがあったとする。 そして、今回はイチゴが売れなかったので、販売データにはイチゴは含まれていないとする。

    商品  数量
0  バナナ   1
1  ミカン   4
2  バナナ   3
3  バナナ   1
4  ミカン   6
5  ミカン   1
6  バナナ   4

このDataFrameを以下のように商品ごとに集計すると、

df = df.groupby('商品').sum()
print(df)

出力結果は以下のようになる。

     数量
商品     
バナナ   9
ミカン  11

この表にはイチゴのデータがなく、レポートとして見たときには網羅性がなくてイマイチなので、改善してイチゴのデータ(販売数は0)も含めたい。

環境

$ python3 --version
Python 3.10.12

$ poetry show | grep pandas
pandas          2.2.1       Powerful data structures for data analysis, tim...

対処方法

groupby()の結果、商品がインデックスになる。 このインデックスをイチゴも含めて再構築すればよい。 具体的には、以下のようにする。

df = df.reindex(['バナナ', 'ミカン', 'イチゴ'], fill_value=0)
print(df)

出力結果は以下のようになり、イチゴの行も含まれる。

     数量
商品     
バナナ   9
ミカン  11
イチゴ   0

reindex()の引数にfill_value=0を付与しない場合は、イチゴの数量は欠損値(NaN)となる。 欠損値を細かく制御したい場合は、fill_value=0を付与せずに、後でfillna()等を実行して適切な値を埋めればよい。

マルチインデックスの場合はどうするか

以下に先程と似たような販売データを示すが、「店舗」という列を付け加えており、A店、B店、C店の3店舗あるとする。 商品は先程と同じくバナナ、ミカン、イチゴの3種類あるとする。

   店舗   商品  数量
0  A店  バナナ   1
1  C店  ミカン   4
2  C店  バナナ   3
3  A店  バナナ   1
4  C店  ミカン   6
5  A店  ミカン   1
6  A店  イチゴ   4

このDataFrameを以下のように商品ごとに集計すると、

df = df.groupby(['店舗', '商品']).sum()
print(df)

出力結果は以下のようになる。

        数量
店舗 商品     
A店 イチゴ   4
   バナナ   2
   ミカン   1
C店 バナナ   3
   ミカン  10

C店にはイチゴのデータはなく、業績不振で商品がひとつも売れなかったB店のデータはまったくない。 そこで、以下のようにして、マルチインデックスを再構築する。

shops = ['A店', 'B店', 'C店']
products = ['バナナ', 'ミカン', 'イチゴ']
df = df.reindex(pd.MultiIndex.from_product([shops, products], names=['店舗', '商品']), fill_value=0)
print(df)
出力結果は以下のように網羅性のある表になる。

        数量
店舗 商品     
A店 バナナ   2
   ミカン   1
   イチゴ   4
B店 バナナ   0
   ミカン   0
   イチゴ   0
C店 バナナ   3
   ミカン  10
   イチゴ   0

参考

stackoverflow.com

付録A シングルインデックスのテストコード

import pandas as pd

data = [
    {'商品': 'バナナ', '数量': 1},
    {'商品': 'ミカン', '数量': 4},
    {'商品': 'バナナ', '数量': 3},
    {'商品': 'バナナ', '数量': 1},
    {'商品': 'ミカン', '数量': 6},
    {'商品': 'ミカン', '数量': 1},
    {'商品': 'バナナ', '数量': 4},
]

df = pd.DataFrame(data)
print(df)

df = df.groupby('商品').sum()
print(df)

df = df.reindex(['バナナ', 'ミカン', 'イチゴ'], fill_value=0)
print(df)

付録B マルチインデックスのテストコード

import pandas as pd

data = [
    {'店舗': 'A店', '商品': 'バナナ', '数量': 1},
    {'店舗': 'C店', '商品': 'ミカン', '数量': 4},
    {'店舗': 'C店', '商品': 'バナナ', '数量': 3},
    {'店舗': 'A店', '商品': 'バナナ', '数量': 1},
    {'店舗': 'C店', '商品': 'ミカン', '数量': 6},
    {'店舗': 'A店', '商品': 'ミカン', '数量': 1},
    {'店舗': 'A店', '商品': 'イチゴ', '数量': 4},
]

df = pd.DataFrame(data)
print(df)

df = df.groupby(['店舗', '商品']).sum()
print(df)

shops = ['A店', 'B店', 'C店']
products = ['バナナ', 'ミカン', 'イチゴ']
df = df.reindex(pd.MultiIndex.from_product([shops, products], names=['店舗', '商品']), fill_value=0)
print(df)

Ubuntu 22.04LTSへのNode.js 20のインストール

はじめに

aptでNode.jsをインストールしたところ、古めのものがインストールされた。

$ sudo apt install nodejs

$ node -v
v12.22.9

執筆時点でのLTSはNode.js 20なので、別の方法でインストールすることにした。

環境

$ cat /etc/os-release | grep PRETTY_NAME
PRETTY_NAME="Ubuntu 22.04.4 LTS"

$ uname -srvm
Linux 6.5.0-18-generic #18~22.04.1-Ubuntu SMP PREEMPT_DYNAMIC Wed Feb  7 11:40:03 UTC 2 x86_64

インストール方法

nodesource.comが提供しているNode.jsのPPAを追加してインストールする。 手順は以下にあり、Node.jsのサイトから辿れる

github.com

具体的には、以下の通りにコマンドを実行する。

$ curl -fsSL https://deb.nodesource.com/setup_20.x | sudo -E bash - && sudo apt-get install -y nodejs

以下を実行して、インストールされたNode.jsのバージョンを確認してみる。

$ node -v
v20.11.1

Pythonのスタックフレームを雑に表示する

はじめに

Pythonの理解を深めるために、スタックフレームからどんな情報が得られるかを調査した。 思いの外大量の情報が得られてカオスになったので、目視できる程度の情報を雑にprint()で表示してみた。

環境

$ python3 --version
Python 3.10.12

コード

コードが雑なので、説明も雑に。。。 スタックフレームのオブジェクトが持つインスタンス変数を表示する。 直接関係ない情報や大量に表示される情報(特に変数とバイトコード)もあるので、ある程度絞り込みを行っている。 中には無限再帰してしまうものもあったので、そういうものは適当に除外している。

import inspect
import json
import collections.abc

from typing import Any


exclude_preds = {
    'frame': lambda name, value: (not name.startswith('f_')) or (name in ['f_back', 'f_builtins', 'f_globals', 'f_locals']),
    'f_code': lambda name, value: (not name.startswith('co_')) or (name in ['co_varnames', 'co_cellvars', 'co_freevars', 'co_code', 'co_consts', 'co_names', 'co_lnotab', 'co_linetable'])
}


def default_exclude_pred(name: str, value: Any) -> bool:
    return name.startswith('_')


def __collect_stackframe_details(name: str | None, value: Any) -> None | bool | int | float | str | list | dict:
    if isinstance(value, None | bool | int | float | str):
        return value
    elif isinstance(value, list):
        return [__collect_stackframe_details(None, entry) for entry in value]
    else:
        result: dict[str, Any] = {}

        exclude_pred = exclude_preds[name] if name in exclude_preds else default_exclude_pred
        for n, v in (value.items() if isinstance(value, collections.abc.Mapping) else inspect.getmembers(value)):
            if exclude_pred(n, v):
                continue

            result[n] = __collect_stackframe_details(n, v)

        return result


def collect_stackframe_details() -> list:
    result = []

    for stack_frame in inspect.stack():
        result.append(__collect_stackframe_details(None, stack_frame))

    return result


print(json.dumps(collect_stackframe_details(), indent=4))

実行結果

$ python3 stack_frame_details.py
[
    {
        "code_context": [
            "    for stack_frame in inspect.stack():\n"
        ],
        "count": {},
        "filename": "/home/jaybanuan/src/stack_frame_details/stack_frame_ditails.py",
        "frame": {
            "f_code": {
                "co_argcount": 0,
                "co_filename": "/home/jaybanuan/src/stack_frame_details/stack_frame_ditails.py",
                "co_firstlineno": 36,
                "co_flags": 67,
                "co_kwonlyargcount": 0,
                "co_lines": {},
                "co_name": "collect_stackframe_details",
                "co_nlocals": 2,
                "co_posonlyargcount": 0,
                "co_stacksize": 6
            },
            "f_lasti": 26,
            "f_lineno": 40,
            "f_trace": null,
            "f_trace_lines": true,
            "f_trace_opcodes": false
        },
        "function": "collect_stackframe_details",
        "index": 0,
        "lineno": 39
    },
    {
        "code_context": [
            "print(json.dumps(collect_stackframe_details(), indent=4))        \n"
        ],
        "count": {},
        "filename": "/home/jaybanuan/src/stack_frame_details/stack_frame_ditails.py",
        "frame": {
            "f_code": {
                "co_argcount": 0,
                "co_filename": "/home/jaybanuan/src/stack_frame_details/stack_frame_ditails.py",
                "co_firstlineno": 1,
                "co_flags": 64,
                "co_kwonlyargcount": 0,
                "co_lines": {},
                "co_name": "<module>",
                "co_nlocals": 0,
                "co_posonlyargcount": 0,
                "co_stacksize": 7
            },
            "f_lasti": 148,
            "f_lineno": 45,
            "f_trace": null,
            "f_trace_lines": true,
            "f_trace_opcodes": false
        },
        "function": "<module>",
        "index": 0,
        "lineno": 45
    }
]

実はパッケージの情報が欲しかった

スタックフレームの中身を確認したかったのは、各スタックフレームがどのパッケージ由来なのかを知りたかったのだが、直接的な情報を見つけられなかった。 手元では試してないが、すごく頑張って似たような情報を構築している例を見つけた。

stackoverflow.com

参考

github.com

docs.python.org

Pythonで関数かメソッドかラムダか__call__()かを判別する

はじめに

Pythonでは、呼び出し可能な関数ライクなオブジェクトをいくつかの方法で作成することができる。

  • 関数として定義
  • ラムダとして定義
  • クラスにメソッドとして定義
  • __call__()を実装することで定義
  • (他にもあるかもしれない)

ここで、デバッグソースコードの解析のために、実行時にできるだけ正確に、どの方法で作成されたかを知りたいという状況になった。 単純にisinstance(x, Callable)するだけだと、xが上記のどれの場合も真になってしまうので、別の方法を考える必要が出てきた。

環境

$ python3 --version
Python 3.10.12

検査の方法

それぞれ個別に判別するため、以下の検査用の関数を作成してみた。 isinstance(x, FunctionType)だけでは関数かラムダかを区別できないので、__name__も検査する必要がある。 ちなみにtypes.FunctionTypeと同様にtypes.LambdaTypeがあるものの、これは実質的にtypes.FunctionTypeの別名であり、ラムダかどうかの判別には利用できない。

from typing import Callable
from types import FunctionType, MethodType

def is_function(x) -> bool:
    return isinstance(x, FunctionType) and (x.__name__ != '<lambda>')

def is_method(x) -> bool:
    return isinstance(x, MethodType) and (x.__name__ != '<lambda>')

def is_lambda(x) -> bool:
    return (isinstance(x, FunctionType) or isinstance(x, MethodType)) and (x.__name__ == '<lambda>')

def is_call(x) -> bool:
    return isinstance(x, Callable) and (not isinstance(x, FunctionType)) and (not isinstance(x, MethodType))

実行結果

以下のテストコードを実行してみる。

# 関数として定義
def no1_func(x):
    return x

# ラムダとして定義
no2_lambda = lambda x: x

class Functor:
    def __init__(self) -> None:
        # ラムダをメンバーとして定義
        self.no3_lambda = lambda x: x

    # メソッドとして定義    
    def no4_method(self, x):
        return x

    # 関数オブジェクトとして定義    
    def __call__(self, x):
        return x

obj = Functor()

funcs = {
    'no1_func': no1_func,
    'no2_lambda': no2_lambda,
    'no3_lambda': obj.no3_lambda,
    'no4_method': obj.no4_method,
    'no5_functor': obj,
}

for name, func in funcs.items():
    print(f'{name:11s} ... ', end='')
    print(f'function: {is_function(func):1d},  ', end='')
    print(f'lambda: {is_lambda(func):1d},  ', end='')
    print(f'method: {is_method(func):1d},  ', end='')
    print(f'__call__: {is_call(func):1d}', end='')
    print()

実行結果は以下の通り。

no1_func    ... function: 1,  lambda: 0,  method: 0,  __call__: 0
no2_lambda  ... function: 0,  lambda: 1,  method: 0,  __call__: 0
no3_lambda  ... function: 0,  lambda: 1,  method: 0,  __call__: 0
no4_method  ... function: 0,  lambda: 0,  method: 1,  __call__: 0
no5_functor ... function: 0,  lambda: 0,  method: 0,  __call__: 1

参考

stackoverflow.com

docs.python.org

Pythonでパスを引数に取る場合の型ヒントの書き方

はじめに

ファイルシステムのパスを引数に取る自作の関数で、その型ヒントを毎回以下のように書いていたが、一般的にはどう書くのかが気になって調べた。

import pathlib

def foo(path: str | pathlib.Path):
    ...

環境

$ python3 --version
Python 3.10.12

結論

stackoverflow.com

ここのStackoverflowにある通り、Python 3.10以降の場合は以下のように、

import os

def foo(path: str | os.PathLike):
    ...

そしてPython 3.5 〜3.9の場合は以下のように書くのが良さそう。

import os
import typing

def foo(path: typing.Union[str, os.PathLike]):
    ...

余談

ちなみに標準ライブラリの型定義(typeshed-fallback)があるようで、これを確認するとパスを表す型ヒントは以下のようになっている。

StrPath: TypeAlias = str | PathLike[str]  # stable
BytesPath: TypeAlias = bytes | PathLike[bytes]  # stable
GenericPath: TypeAlias = AnyStr | PathLike[AnyStr]
StrOrBytesPath: TypeAlias = str | bytes | PathLike[str] | PathLike[bytes]  # stable

stringとbytesの考慮があるが、これはpath-like objectの定義を確認すると以下のようになっているためと思われる。

An object representing a file system path. A path-like object is either a str or bytes object representing a path, or an object implementing the os.PathLike protocol.

dictからPandasのDataFrameを作成する

はじめに

dictからPandasのDataFrameを作成するという、ググればすぐ出てくるような話だが、ちょっと悩んだのでメモを残しておく。

課題

Pandasを利用して、以下のようなdata1から、

data1 = [
    {'col1': 1, 'col2': 2},
    {'col1': 3, 'col2': 4}
]

以下のようなDataFrameを作成したい。

col1 col2
0 1 2
1 3 4

ところが、ググった感じでは以下のようなdata2に変換が必要に思えた。

data2 = {
    'col1': [1, 3],
    'col2': [2, 4]
}

自分が扱う業務データは、ほぼ100%列ごとではなく行ごとに整理されているので、これだと変換の手間がバカにならない。

結論

実は、そのままのdata1で期待するDataFrameが作れた。

import pandas as pd

data1 = [
    {'col1': 1, 'col2': 2},
    {'col1': 3, 'col2': 4},
]

df = pd.DataFrame(data1)

print(df)

出力結果は、以下のように期待通り。

   col1  col2
0     1     2
1     3     4

ちなみに、以下の方法でDataFrameを作成しても同じ結果を得られる。

df = pd.DataFrame.from_records(data1)

ハマりどころ

様々な方法でDataFrameを作成できるのだが、DataFrameのドキュメントのExamplesにはdata1のパターンの記載がないのでdata1が受け入れられないように読めてしまった。 しかし、よく読むとNoteに以下の記載があり、

Please reference the User Guide for more information.

User Guideのリンクを辿ると、より詳しくDataFrameの作成のバリエーションが説明されている。 APIリファレンスには必要事項が網羅的に書かれているという思い込みがあったので、User Guideに辿り着くまでに時間がかかってしまった。

Ubuntu 22.04LTSでWiresharkを一般ユーザで起動する

はじめに

Wiresharkをインストールしたが、一般ユーザではパケットキャプチャがうまく動作しなかったので、調べた結果を残しておく。

環境

$ cat /etc/os-release | grep PRETTY_NAME
PRETTY_NAME="Ubuntu 22.04.3 LTS"

$ uname -srvm
Linux 6.2.0-36-generic #37~22.04.1-Ubuntu SMP PREEMPT_DYNAMIC Mon Oct  9 15:34:04 UTC 2 x86_64

インストール手順

まず、以下のようにaptを実行してWiresharkのインストールを実行する。

$ sudo apt install wireshark

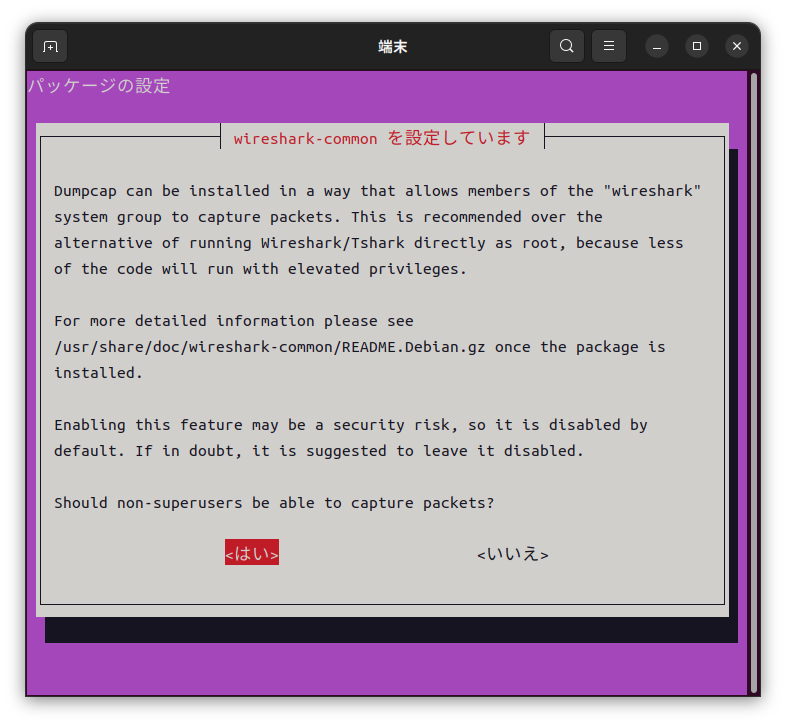
すると、インストールの途中で以下の画面が表示される。 root以外の一般ユーザでもWiresharkを実行したいので、「はい」を選択して、インストールを完了させる。

この段階では、まだroot以外のユーザではパケットキャプチャがうまくいかない。 ここで、先程の画面に表示されている文章を訳すと、以下になる。

Dumpcapはシステムのグループである"wireshark"のメンバーがパケットをキャプチャできるような方法でインストールすることができます。これは、権限昇格して特権で実行するコードが比較的少量で済むため、rootで直接 Wireshark/Tsharkを実行するという選択肢よりも推奨されます。

より詳細な情報については、パッケージのインストール後に/usr/share/doc/wireshark-common/README.Debian.gzを参照してください。

この機能の有効化はセキュリティリスクになり得るため、デフォルトでは無効化されています。もし迷う場合は、無効化のままにしておくことを推奨します。

スーパーユーザー以外もパケットをキャプチャできるようにしますか?

ということで、以下のコマンドを実行してREADME.Debian.gzの内容を確認してみる。

$ zcat /usr/share/doc/wireshark-common/README.Debian.gz 

これを読むと、root以外のユーザでも実行できるようにするには、以下のコマンドを実行してそのユーザをグループwiresharkに追加せよ、とある。

$ sudo usermod -a -G wireshark {username}

これで、一般ユーザでもWiresharkによるパケットキャプチャが可能になった。

ちなみに、README.Debian.gzによると、以下のコマンドを実行することで上掲のスクリーンショットの選択画面を再実行できるとある。

$ sudo dpkg-reconfigure wireshark-common

参考:README.Debian.gzの内容

I. Capturing packets with Wireshark/Tshark

   There are two ways of installing Wireshark/Tshark on Debian; the
   installation process may offer a choice between these two ways,
   asking "Should non-superuser be able to capture packets?"

   I./a. Installing dumpcap without allowing non-root users to capture packets

      Only root user will be able to capture packets. It is advised to capture
      packets with the bundled dumpcap program as root and then run
      Wireshark/Tshark as an ordinary user to analyze the captured logs. [2]

      This is the default on Debian systems; it is selected by answering
      "<No>" to the question mentioned above.

   I./b. Installing dumpcap and allowing non-root users to capture packets

      Members of the wireshark group will be able to capture packets on network
      interfaces. This is the preferred way of installation if Wireshark/Tshark
      will be used for capturing and displaying packets at the same time, since
      that way only the dumpcap process has to be run with elevated privileges
      thanks to the privilege separation[1].

      This is selected by answering "<Yes>" to the question mentioned
      above.

      Note that no user will be added to group wireshark automatically;
      a system administrator has to add them manually, using the usermod
      command:

         sudo usermod -a -G wireshark {username}

      or, if you're using a desktop environment that includes a tool for
      managing users, such as the "Users and Groups" tool in GNOME (found
      in the gnome-system-tools package), using that tool.  After a user
      is added to the wireshark group, she/he may need to log in again to
      make her/his new group membership take effect and be able to capture
      packets.

      The additional privileges are provided using the Linux Capabilities
      system where it is available and resorting to setting the set-user-id
      bit of the dumpcap binary as a fall-back, where the Linux Capabilities
      system is not present (Debian GNU/kFreeBSD, Debian GNU/Hurd).

      Linux kernels provided by Debian support Linux Capabilities, but custom
      built kernels may lack this support. If the support for Linux
      Capabilities is not present at the time of installing wireshark-common
      package, the installer will fall back to set the set-user-id bit to
      allow non-root users to capture packets.

      If installation succeeds with using Linux Capabilities, non-root users
      will not be able to capture packets while running kernels not supporting
      Linux Capabilities.

      Note that capturing USB packets is not enabled for non-root users by using
      Linux Capabilities. You have to capture the packets using the method
      described in I./a., setting the set-user-id permanently using
      dpkg-statoverride or running dumpcap as root.

      The installation method can be changed any time by running:

         sudo dpkg-reconfigure wireshark-common

      The question mentioned above will be asked; answer "<Yes>" to it.


II. Installing SNMP MIBs

    SNMP [4] OIDs can be decoded using MIBs provided by other packages.
    wireshark-common suggests snmp-mibs-downloader which package can be used to
    download a set of common MIBs Wireshark/Tshark tries to load at startup.

    At the time of writing, MIBs are distributed under DFSG incompatible terms
    [5] thus snmp-mibs-downloader has to be in the non-free archive area.
    To keep wireshark in the main area [7], wireshark-common does not depend on
    or recommend snmp-mibs-downloader and as a result snmp-mibs-downloader is
    not installed automatically with wireshark.

    To make Wireshark/Tshark able to decode OIDs, please install
    snmp-mibs-downloader manually.

    To help Wireshark/Tshark to decode OIDs without having to install packages
    manually, please support the initiative of requesting additional rights
    from RFC authors [5].


   [1] https://gitlab.com/wireshark/wireshark/-/wikis/Development/PrivilegeSeparation
   [2] https://gitlab.com/wireshark/wireshark/-/wikis/CaptureSetup/CapturePrivileges
   [3] https://blog.wireshark.org/2010/02/running-wireshark-as-you
   [4] https://gitlab.com/wireshark/wireshark/-/wikis/SNMP
   [5] https://wiki.debian.org/NonFreeIETFDocuments
   [6] https://www.debian.org/doc/debian-policy/ch-archive.html#s-non-free
   [7] https://www.debian.org/doc/debian-policy/ch-archive.html#s-main